Welcome to SyncRPG!
SyncRPG is a set of online tools, rules, and art assets aimed at facilitating the creation, sharing, and playing of traditional roleplaying games over the internet. It is used to help run games more efficiently, to allow Game Masters to share their encounters and NPCs with each other, and to allow players to keep historical records of their characters forever, online.
The primary focus of these tools are to reduce Game Master workload and prep time so that they can get to playing their games as quickly as possible.
For more information about our company, site, and mission, please visit our About page.
-

SyncRPG connects your Google Drive character sheets with tokens to push your data from the web into your VTT client. Change your sheet on the fly and pull in your latest statistics!
-
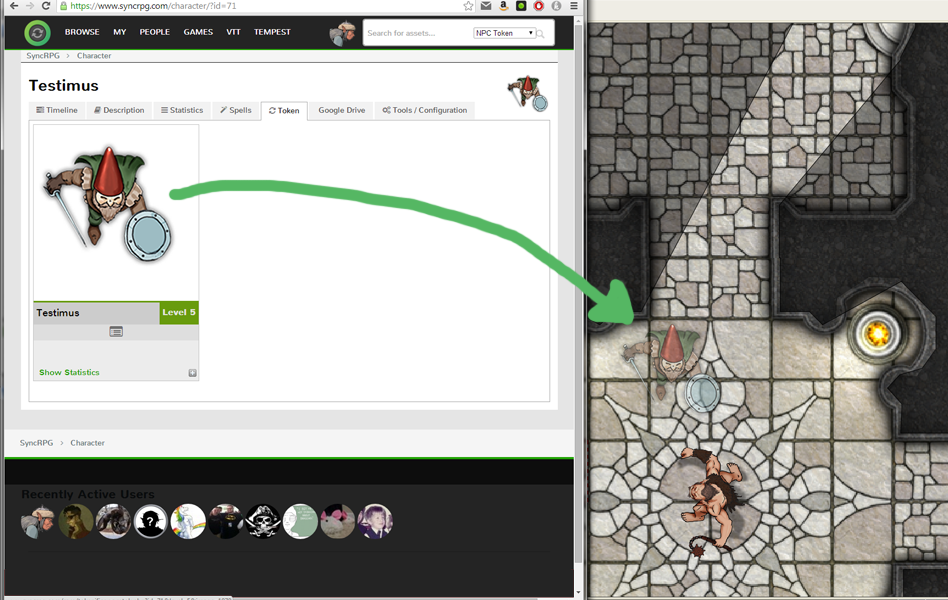
Once a character is in our system, they can be dragged from the website directly into the VTT, ready to roll with our provided macro framework.
-
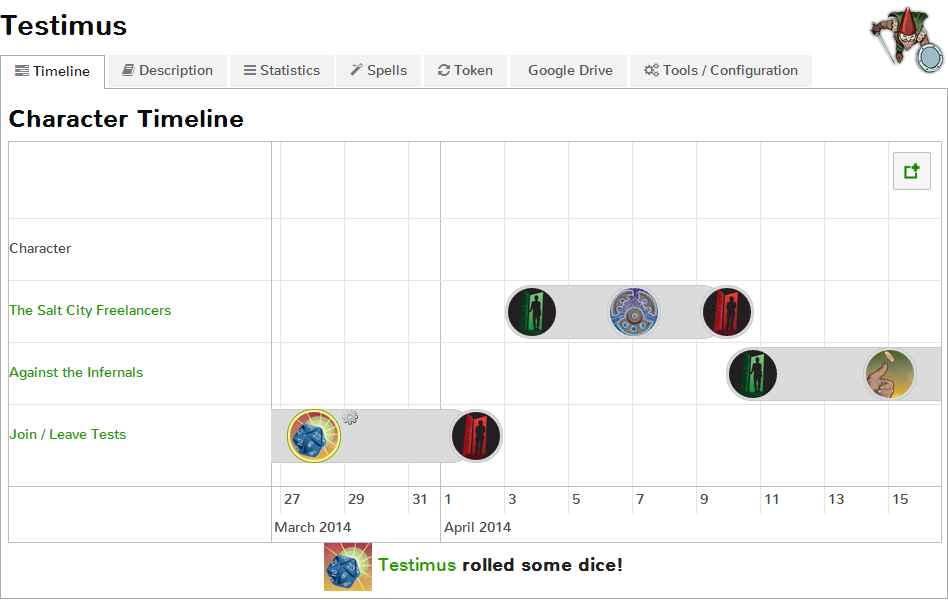
Characters on our site have areas for detailed descriptions, histories, and event timelines that chronicle events that happened to them during their adventures.
-
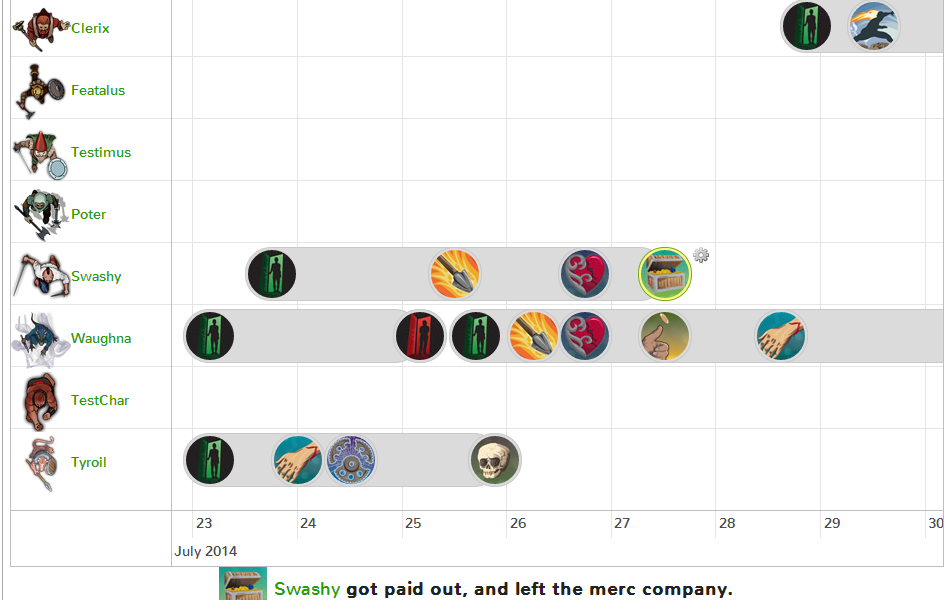
Character histories and events are also shown on the games that they belong to, allowing users to see everything that happened to each character in a game.
-
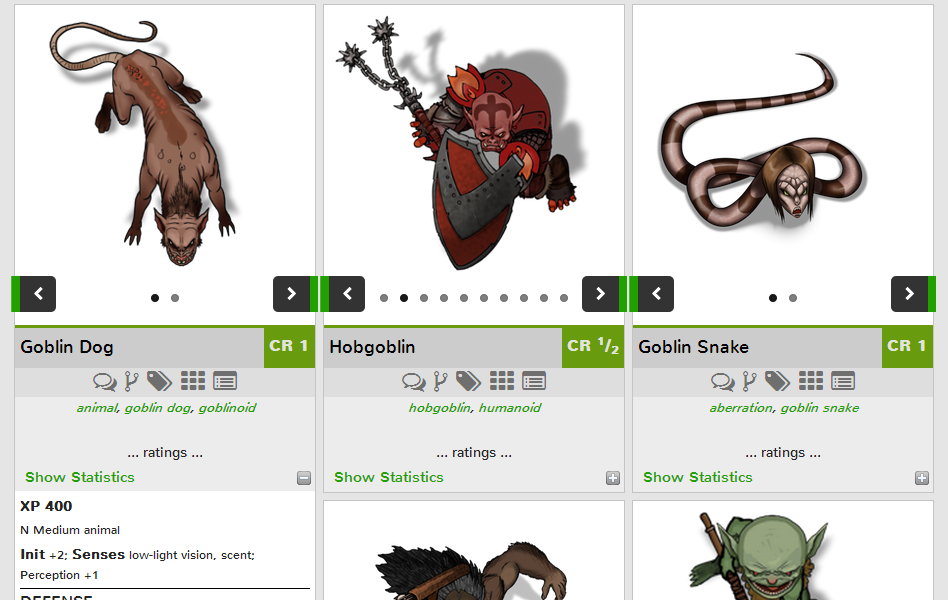
NPC tokens with full statistics and appropriate art can be found using the sites search tools, and easily dragged right into the VTT, ready to roll with zero prep time.
Recent Blog Posts

The Dankwood, by Jeff Brown
For Tech Tuesday this week I will again continue the recent “Tips” series for running Captured by Adventure, going over Part 3: Through the Dankwood. As the sun begins to set after the events on the beach, the party dashes back into the Dankwood jungle, heading towards a pass about twenty five miles away, nestled between two distinctive peaks in the Orange Mountains. Along the way they will bump into various beasts and denizens of the humid jungle, both friend and foe.
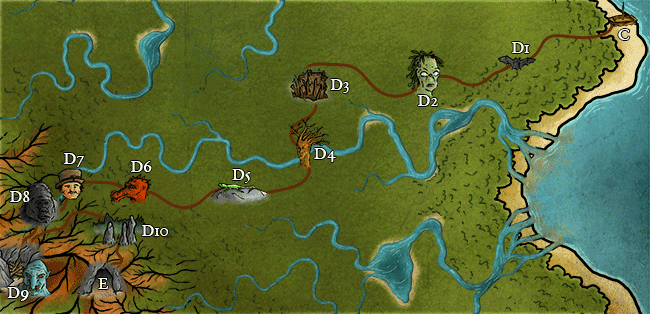
The path of the party from the beach through the Dankwood.
Part 3 is one of the longest sections of the adventure, with ten encounters spread throughout the Dankwood. As always, all of the encounters have maps and NPC tokens ready to go, as well as read-aloud sections to set the scene for each encounter and advance the timeline of the adventure. The first encounter takes place after the sun has set, but it begins to rise again during the third. It will take another full day beyond that to reach the end of the Dankwood jungle, marking two days since they were captured by the Red Tusk orcs.
For the first encounter, the party hears the flapping of leathery wings and has a chance to notice smaller bats as they approach the hunting grounds of a pair of dire bats. As they enter the small clearing, have them roll Perception checks against the bat’s Stealth. On a success, allow them a surprise round to react to the dog-sized bats before they drop from their perches. The fight is straightforward: The bats aren’t especially nimble and can’t use dive-bomb, fly-by attacks, and mostly hover in the PCs faces while biting at them.
A few hours later, a group of vegepygmies happens upon the party. The small plant creatures attempt to hide in the brush (remember to add +8 to their Stealth rolls!) and surround the party as they move through a clearing. A single vegepygmy will present himself to the party and attempt to communicate, but their limited languages and inability to speak at all quickly devolve into frustrated pantomiming. They try to convey that they are looking for a halfling that has wronged them somehow, but at this point the party knows nothing that can help them. Depending on how well the party communicates with the plant people, this encounter can end peacefully, or with the other vegepygmies jumping out from the undergrowth and attacking the PCs.
As the sun begins to rise, the party finds themselves on a narrow, winding pathway that seems to have had a good deal of foot traffic. This is beneficial in that they make good time through this section of jungle, but as one would expect, well-traveled areas are rife with potential perils. In a particularly narrow section, a hunter has set up a spiked pit trap and done a good job of covering it. Whoever set it is nowhere nearby at the moment, and the pit is more of a nuisance than a life-threatening trap.
If the vegepygmies left peacefully but frustrated with the party in the previous encounter, or if they believe the PCs to be lying about not knowing about the halfling, they may have followed them to this area and decide to take advantage of the party’s situation.
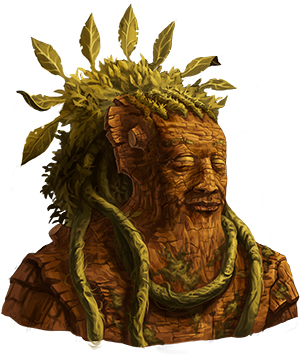
Old Garumba, a friendly treant living in the Dankwood.
Now in the full light of day, the party continues to move towards the mountain pass. The sound of a large, rushing river fills their ears long before they can see it. As they reach the river and begin to ponder how to best move across it, a voice speaks, seemingly from nowhere. “Hello younglings...” Looking around, the party notices Old Garumba, a female treant who leads a simple life tending to the plant life of the Dankwood, and loves to hear stories of the larger world.
This is a roleplaying encounter that gives the party some time to flesh out their characters in an adventure that’s relatively rushed. Old Garumba asks each of the PCs to tell her a story about their lives, where they’re from, or what sort of adventures they’ve been on. Let the players have some fun with it and encourage them to expound on their backstories here. Old Garumba knows a good deal about the Dankwood and the orcs following the PCs, and she’s willing to share her own tales if the party is interesting and polite enough. She rewards them based on how many true stories are told, with some wealth and potentially two magic wands that the party will be excited to receive.
Excited about the chat with the treant and their new magic wands, the party continues on to the mountain pass. The next encounter takes place in another clearing, with a large lizard sunning himself on a rock. The party sees it at the same time that it notices them, and the encounter proceeds normally as the lizard moves to defend its territory. Don’t forget about the lizard’s poison!
A bit later in a particularly marshy part of the jungle, the party spies two green-scaled kobolds darting between trees, apparently traveling in the same direction as them. Those kobolds haven’t noticed the party, but the six shadowing the scouts certainly do. Allow the party to set up and get the drop on the first two kobolds, and then shatter their overconfidence with the second wave. The little lizard people are much easier to deal with than the orcs the party has fought in the past, but in large numbers they can prove deadly. Kobolds are pretty cowardly creatures, so feel free to have injured ones run away!
This encounter with the kobolds is a bit of foreshadowing for Part 4: A Dungeon Adventure. The kobolds are moving to an abandoned mine, where a kobold spellcaster calling himself Wyrmscale has started a new tribe. There will be more on this in the next blog post, but if you’re looking to tie the areas together, you can have the party take one of them alive for questioning.
Moving out of the jungle and into the forested foothills, the party meets Pethogg, a halfling merchant in filthy, tattered clothes. Another roleplaying encounter, the halfling admits to being a bit lost and attempts to hock dubious alchemical wares to the party. If questioned about the vegepygmies, he explains that their chieftain misread the labels on vials he sold to them and drank a vial of alchemist’s fire. He’s been hiding from them ever since. He’s cheery and willing to talk and trade with the party, but he has no interest in traveling in a large, visible group.
Heading further into the mountains, the thick vegetation that has dominated the landscape so far begins to thin out and give way to rocky terrain. With the pass looming large before them, the party notices a little too late that they have walked in on two gorillas beating their chests in displays of dominance. For a moment it looks like they will fight each other, but they quickly turn to deal with the intruders. The four hundred pound apes lurch forward and attack the most intimidating looking PCs.
Finally at the mountain pass, the party is distraught to find it blocked by fallen trees, and covered in large, shadowy figures. Moving closer to investigate they can clearly see that the giants are in fact trolls, and there are far too many for the party to deal with. Before they can get their bearings, a lone troll wanders down the path and spots them, drool dripping from his mouth.
This is one of the most difficult encounters in the adventure, a second level party dealing with a CR 5 troll. The giant’s full attack is enough to savage a low-level PC, and If they don’t have a reliable way of shutting down its regeneration it’s going to be a very rough fight. Be sure to allow the PCs knowledge checks to see what they know about trolls and their weaknesses, and be sure to play up exactly how large and terrifying a troll would be to the characters. If they decide to engage, I tend to be generous, and give the troll a full round of walking over and a single swing before launching into its full attack. If things start to go sideways, remind your players that there’s no shame in running away from a fight!

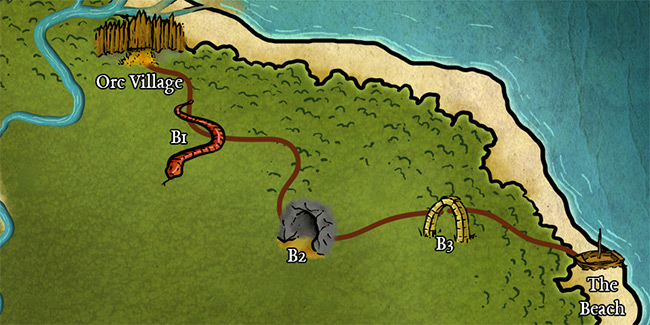
Ivug Scrogg, a gruff and unlikable druid.
The final encounter in the Dankwood takes place in a small grove on the mountainside, an odd patch of vegetation on the rocky cliffs. It is there that they meet Ivuk Scrogg, a gruff and unlikeable druid. He’s a bit of a “sage on a stage,” insults the party’s lack of reverence for nature, and generally gives them a hard time, clerics especially. While annoying, he doesn’t actually wish them any ill will. After haranguing the cityfolk who “got lost in the jungle” he informs them of another way to cross the Orange Mountains, and offers to let them rest for the night in his grove for the night. He assures the party that they are completely safe, and although they may not believe him, he is being sincere.
The next morning the PCs wake up refreshed, and should be ready to follow Ivuk’s directions to an abandoned mine, which is the same one the kobolds from earlier were heading to. We’ll pick up there next week, when we go over how to run Part 4: A Dungeon Adventure.
“Tips” Series for Captured by AdventureDiscuss 'Tips for Running Captured by Adventure: Part 3' on the SyncRPG forums

Daniel Strongcurrent is an Ironist Ranger that helps the PC through Part 2.
Continuing our “Tips” series from last week’s post about Part 1, this week I will be going over the second part of Captured by Adventure: the Race to the Ranger’s Ship. This section of the adventure begins after the party escapes the orc village and meets with the Ironist ranger Daniel Strongcurrent. Explaining to them that he has a boat moored not too far away, he leads the party through several jungle encounters and across a marshy beach.
Before we go into things encounter by encounter, I’d like to suggest taking some time to let the party get to know Daniel while they move through the jungle. He travels with and defends the party through all of Part 2, and he plays a big role in their escape from the Red Tusk orcs: thestory will be enhanced the more the party likes Daniel.
The Race to the Ranger's Ship.
In Flight from the Dark the party mostly has to deal with wild animals native to the Dankwood jungle. First comes a constrictor snake in a shallow bog about two feet deep. Treat the water as rough terrain, and I sometimes like to hassle small characters by making Swim checks. Allow the players to choose a marching order or general strategy for crossing the bog, and send the snake after the last character to cross. Have the party make a Perception check versus the snake’s Stealth, and see if it can get the drop on them. The snake isn’t particularly powerful, but its grapple can be dangerous for a low level character if the party doesn’t react quickly.
The next encounter takes place at a leopard’s den and is optional. If the players leave the area undisturbed, they can avoid the encounter entirely, but if have the gall to enter the den of a jungle cat, there’s some material wealth to be found within. A leopard is powerful foe for a first level party, especially with pounce and rake, so when describing the cave and area around it, try to really play up the claw marks gnawed bones. You can also use Daniel to help impress the danger of poking around the area, and have him keep watch to bear the brunt of the leopard’s initial assault.
The final interesting location before the beach are ancient, giant-built ruins. They are an interesting bit of history, informing the players that the orcs weren’t the first inhabitants of the jungle, but if the players dawdle for long you can use Daniel to urge them to continue onward to the beach. There are some items to be found amongst the ruins, as well as a simple pit trap. The map file provides a token with macros to reveal the art to players and roll the damage.
The Tempest Iconic characters flee the jungle and make their way to Daniel's boat as the orc search party catches up.
The Beach is primarily wet sand and shallow lagoons, which hampers movement to varying degrees. You’re free to ignore the rough terrain in your game if you don’t like it, but I like the pacing of the encounters at that speed, and players in my games have found it fun to try to jump from dune to dune, avoiding the wet sand.
As soon as the party reaches the beach, a scouting party of Red Tusk orcs bursts through the treeline. I allow the players to set up however they like in the northern area of the beach, and give them enough space to ensure a round to react to the orcs before being hit in melee. I enjoy having some orcs throw tridents while others double-move to close the distance with the party. The orcs have to trudge through the marshy beach just like the PCs, and if the party maintains decent mobility the orcs should be easy to handle.
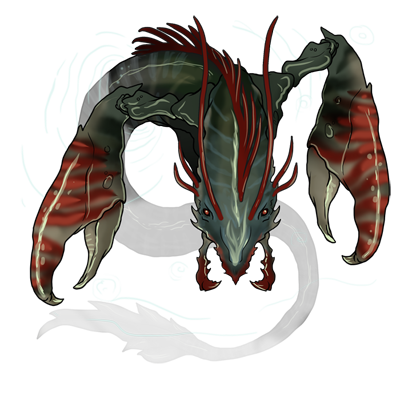
Further south, a pair of lagoons dominate the middle of the map. Here the party will encounter three reefclaws—horrible, dog-sized aberrations resembling a lobster mixed with an eel. Place the reefclaws however you like, in whichever lagoons make the most sense based on how the players are moving. Just as you did with the snake in the jungle, as the players approach the lagoons have the players make a Perception check versus the reefclaw’s Stealth check.
The hideous monsters claw at anyone who draws near the lagoons, trying to grab them and drag them into the water. They are tenacious, and their poison and death frenzy make them powerful foes. When the PCs first encounter one, it can be fun to allow them a knowledge check to see what they know about reefclaws, and then roleplay how dangerous they think they are.
After that, there’s just one more encounter before the party reaches Daniel’s ship! Behind the party, orcs can be seen battling with more reefclaws that have come out of the lagoon. Two giant cavefisher crabs have made their home on the rocks near the southernmost lagoon, and launch their filaments at the party as they run for the boat. If any of the filaments hit, the crabs attempt to pull the PC through the water, up the rocky ledge, and then drop them. The party should have ample time to stop these events from unfolding, either by cutting the filaments or killing the crabs.
When the party reaches the boat, give them some time to go through Daniel’s supply crates and pick out whatever gear they’d like. At this point the PCs should have gear appropriate for their level, and if the characters in your game are still missing any class or character specific items this is a good place to throw them in. As soon as they’re ready, it’s time to begin the read-aloud section about the boat, the imminent orc attack, and Daniel’s heroism.
Part 2 ends with the party running back into the Dankwood jungle, heading towards a mountain pass Daniel pointed out in the setting sun. They gain the experience to reach level 2, and receive a full night’s rest in something akin to an “adrenaline rush,” allowing them to heal a bit and refresh their daily abilities before heading into Part 3: Through the Dankwood.
Discuss 'Tips for Running Captured by Adventure: Part 2' on the SyncRPG forums
I’ve recently just started up a new weekly game of our first adventure module, Captured by Adventure, that includes vulmar1 and some players from Something Awful. The sessions are streamed on the SyncRPG Twitch channel, and the recordings will be archived in the Captured by Adventure playlist on our YouTube channel.
This is my third time running the adventure, and I’ve realized that I’ve never created a basic, “how to run this” sort of tutorial, or provided a short list of tips to help people in running them game themselves. Over the next few weeks I plan to release a post and for each section of the adventure, from Parts 1 to 5.
As this is the first video in the series, in addition to going over Part 1, I’ll also touch on some of the other useful nodes in the early module map.
The Introduction node describes the five major sections of the adventure, as well as when the PCs can be expected to level up during it. It also touches a bit on the background of the adventure and the PC’s status as unarmed prisoners, as well as noteshow to handle starting equipment and animal companions.
The Files and Recurring NPCs node contains links to the ready-to-go VTT campaign files, as well as descriptions and widgets for three NPCs that appear several times in the adventure.
Part 1 of the adventure starts with the player characters as prisoners: shipwreck survivors captured by the Red Tusk orcs, dragged back to their village, and locked in bamboo cages. The guards, weary from a long day of celebration, drift off to sleep, and the PCs seize the opportunity to escape. Part 1 ends when the party exits the village through any of the various ways outlined in A. Buridakk - The Red Tusk Village.
The first few encounters have the party fighting run of the mill orc warriors armed with tridents instead of falchions, greataxes, and javelins. The initial fight jump-starts the action! It is with two unconscious guards and the party all but unarmed. Allow the characters to use their class powers, spells, feats, and skill checks in creative ways to escape the cages and line up coup-de-graces on the slumbering guards.
With two suits of armor and a few tridents, the PCs will likely begin sneaking around the camp, searching huts for more gear that might prove useful in their escape. As noted in the module content, there is a macro that appears in the VTT that will roll randomly on the table and let you know what the players find in a given hut. Feel free to customize the huts with items your party might want or need.
After the party has searched a few huts, it’s time to throw a patrol at them. Still easing into things with a presumably under-geared party, the first patrol is distracted, allowing the party a surprise round. Remember that a few arrows from Daniel Strongcurrent can be used to help turn the tide of battle if things go awry during the party’s escape. After resolving the combat, the PCs will return to moving around the camp. The two other patrols can be used whenever it feels right, or if the dawdles too long in any one area. You should also consider creating your own patrol and sharing it on SyncRPG for others to use!
At this point, it’s completely up to the party to decide where to go. There are three primary ways to exit the camp: through the main gate in the south, over a collapsed tree in the north, and through a secret tunnel in the west. The main gate is heavily guarded, with four normal orcs and a powerful fighter. A direct assault is ill advised, so try to play up how strong or well-trained Grimtusk appears in order to encourage the party to come up with creative solutions to engage him or otherwise exit the camp. There are macros available on the SyncRPG token in the VTT for the traps near Thragg’s sleepwalking, and to knock down trees for the players to cross over.
In the next post, I’ll be going over Part 2: Race to the Ranger's Ship!
Discuss 'Tips for Running Captured by Adventure: Part 1' on the SyncRPG forums